Showing posts with label Tutorial. Show all posts

Tuesday, February 17, 2015

Heartfelt Thanks - SugarPea Designs Tutorial

I hope you all had a nice Valentine's Day. I'm sure by now you are all done with all the hearts and pink and red and I promise this will be the last of my pink cards for awhile (maybe).

This a little tutorial I did for the SugarPea Designs Blog this week. I combined a clean and simple design with some mixed media.

I love to use dies in different ways and so for my card, I decided to use the Notched Heart Journal Card die to make a stencil by using it to cut a thin piece of acetate. This was a piece of packaging I saved from a stamp set. I used the acetate so that I can reuse the stencil for awhile since this material holds up better than cardstock but if you were only going to use it once, you could easily use a heavier piece of cardstock or light weight chipboard.


Using post-it notes, I masked off a section of my cardstock that is approximately 2”.


I then sponged some distress ink onto the area that I masked off.


I then mixed a little modeling paste and a couple sprays of dye ink together to get a darker pink paste.


I laid down my stencil and applied my paste over the hearts.


When you are done, remove the post-it notes. This technique gives your card some dimension and texture but not a lot of weight. You could also add some glitter to the paste if you wanted or use an iridescent paste.


After your panel has dried, embellish as you wish, add you sentiment and adhere to your card base.


Products Used:
Stamp Set - Foxy Friends
Ink - Versafine Onyx Black, Spun Sugar Distress Ink
Paper - SS White, Raspberry Fizz
Notched Heart Journal Card, Modeling Paste, Dylusions Cherry Pie spray, embroidery floss, adhesive gems

Friday, February 28, 2014

4" x 4" Accordion Mini Album (Video Tutorial)


I have a short video showing you how I made the mini album I posted this week. It uses only one sheet of 12" x 12" cardstock. Below the video, I have the basic measurements written out.


Your 12" x 12" cardstock will be cut to yield the following:
  • One piece that measures 4" x 12" which will be scored on the 12" side at 4", 5", 9" and 10". This will be your album cover.
  • Two pieces that measure 3 7/8" x 11 5/8"; both will be scored on the 11 5/8" side at 3 7/8" and 7 3/4". These will be folded mountain/valley and will make up your inside pages.
Your inside pages will measure 3 7/8" square. You can make them 4" if you like, but I found that the pages fit better inside the album when they are just a tiny bit smaller.

Please feel free to email me at cibglazer(at)gmail(dot)com if you have any questions.


Thursday, August 22, 2013

Flower Soft - Tall Tails Rudolph


Rudolph - E31, E33, E34, E35, E37; Antlers - E40, E42, E42, E43; Hooves - T3, T5, T7; 
Scarf and Holly - R24, R27, R29, R89, YG93, YG97, YG99

This week, the Flower Soft DT will be introducing you the new line of Tall Tails stamps. I have a CAS card for you using the reindeer image from the Owl and Reindeer stamp set and I decided to use some Kool Tak transfer foil to make him look like Rudolph.

Below is a quick tutorial on how to make Rudy's nose shine and "glow".


I stamped and colored my image with copics and then cut a small piece of the red transfer foil.


Using a piercing tool, I removed a mini glue dot from the roll.


I carefully placed the glue dot on Rudolph's nose and then placed the transfer foil (silver side down; red side up) on top of the glue dot.


I gently burnished and then removed the the foil.


Isn't that super simple?

The transfer foils are easy to use with almost any adhesive and can add some serious pizzazz to your projects.

Please be sure to check out the Flower Soft Blog and Facebook page for more samples using these new stamps sets.


Products Used:
Stamp Set - Flower Soft Tall Tails Owl and Reindeer
Paper - SS White and Pure Poppy
Ink - Memento Tuxedo Black
Kool Tak Transfer Foil - Holiday Colors; MFT Fishtail Flags Die-namics; Wink of Stella Clear; Copic Markers

Wednesday, May 9, 2012

Tea Box Tutorial

Pin It
I created this Tea Box for a Heartfelt Creations Design Team project and I thought I would share the tutorial on how to make the box with you.  You can see the complete tea box and card set HERE.


  • Cut cardstock to 8.75” x 12” and score along 12”side at 3”, 5.75”, 8.75” and 11.5”.
  • Turn cardstock 90 degrees and score at 3” along the length of the cardstock.
  • Score at 2.25” from top to the first score line and then skip one panel and continue to score to bottom (Figure 1 - Blue line).
  • Score at 4” on the bottom two panels. (Figure 1 - Red line).

Figure 1

  • Remove shaded areas shown in Figure 2.

Figure 2
To make the tea box lid cut cardstock to 3 7/8” x 3 5/8” and score on all sides at 1/2”.  This lid will fit inside the top of the box.

Using largest Spellbiners Labels 1 die, cut 4 pieces of cardstock and 2 pieces of thin chipboard.  Sandwich one piece of cut chipboard between two pieces of cardstock and glue.  Repeat with other pieces and glue lid to the bottom of one to create box top.

For this box, the following are the measurements for each panel:

Blush Cardstock
(2) pieces 2.75” x 5.5” (sides)
(1) piece 2.5” x 4.5” (front)
(1) piece 2.5” x 5.5” (back)

Patterned Paper
(2) pieces 2.25” x 5.25” (sides)
(1)  piece 2.25” x 4.25” (front)
(1) piece 2.25” x 5.25” (back)


Monday, February 22, 2010

Rolled Fabric Flowers


Rolled Fabric Flower Tutorial
from Rhonna Farrer on Vimeo.


Thought you might like this video I stumbled across during my blog hopping this weekend. These flowers are awesome! I can see them adorning many a card or scrapbook page.

Friday, February 12, 2010

Thinking of You - Masking Tutorial

PTI - Through the Trees

When I saw this stamp set from Papertrey, I knew it was a must have for me.  I just love these trees and the rest of the set is awesome as well.  I thought I would try my hand at a sympathy card and this is what I came up with and how I did it. 

Once again, I used a leftover scrap cut from a nestabilities die as a mask.  I put a little removable adhesive on the back and centered it on my cardstock.

I sponged PTI Smokey Shadow ink around the edges of the mask and along the edges of the card stock.

I then stamped the leaves image from the stamp set around the edges of the cardstock in Smokey Shadow.

When I lifted the mask, I was left with a blank white area in which to stamp my focal image.  I used my adhesive eraser to make sure I removed any residual adhesive.


I then stamped the trees and mounted the completed image onto a Smokey Shadow cardstock base and added my sentiment and charcoal gems.


I really like the understated, monochromatic look of this card. I hope you do to.

Friday, November 20, 2009

Christmas Ribbon Wreath (Video Tutorial)


Wednesday I was scheduled for jury duty but I did not have to report. The way my luck HAS been running, I was sure I would be picked for a super long trial but somebody up there had my back. Instead I used my time wisely and made yet another Christmas card using a technique I want to share with you. It's something a friend taught me...how to make this ribbon wreath.


Click to enlarge

I want to point out the bow on my wreath is a double bow and was made with my Bow Easy. I just love this little gadget and it was worth every cent! The sentiment is from the CTMH Say It In Style stamp set. I sponged around the edges of my "door" and panels with Distress Ink Antique Linen and then the very edges with CTMH Chocolate. The door handle is a CTMH Pewter Designer Brad.

Below is a video tutorial I made with my iphone. I think you'll be surprised at how easy these ribbon wreaths are to make. They can be made in different sizes and with different ribbon widths. You will want to start with a fairly long piece of ribbon. When you want to end the weave, simply slip one of your ends through the loop. I hope you will give this a try.


(ETA: You may also want to check out my Valentine card using this technique HERE.)

(ETA: I have had several requests for the following information. I purchased my Bow Easy on Ebay
HERE. You can also find it for sale at Gina K. Designs HERE.)

Saturday, August 22, 2009

Circle Card - Trust Your Heart


Here's a sneak peak at September's CTMH Stamp of the Month, Treasures. This card gives me the perfect opportunity to show you how I make my circle cards using the Cuttlebug. For this card I used the largest scallop circle but you can easily adapt this to any of the nestabilities dies.

I used a 4 1/2" x 8 1/2" piece of cardstock folded in half. Make sure the crease is at the top and is NOT being cut by the die.

You can see the top of the nestabilities die peaking out above the crease of the cardstock. Place the B plate on top and run through your Cuttlebug.


Your card will come out looking like this, with the crease uncut.

Since I do not like to see the crease on my circle cards, I cut an additional scallop circle and adhere it ontop of the base. This is the same method I used for the card in this post.

CTMH Products
Cardstock – Colonial White, Twilight
Ink – Twilight
Stamp Set – Treasures (September 09 SOTM)
White EP

Other
Adhesive gems
Nestabilities dies

Friday, August 14, 2009

Looks Like Leather - Tutorial


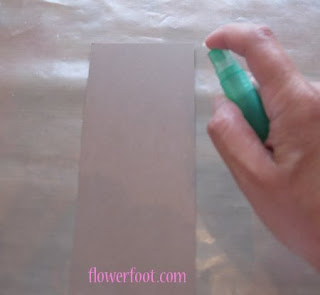
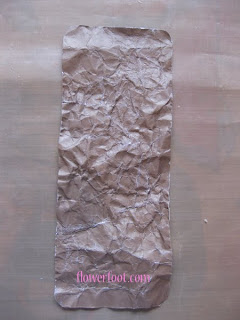
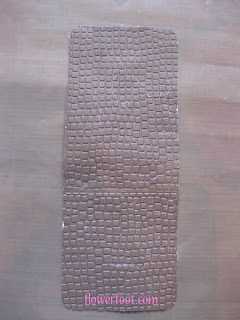
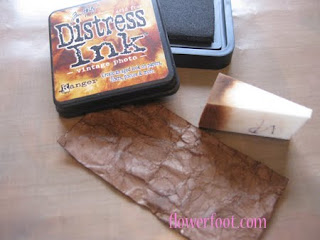
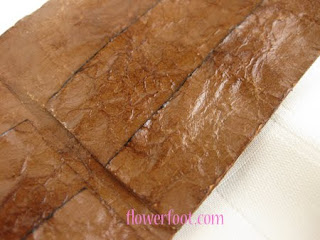
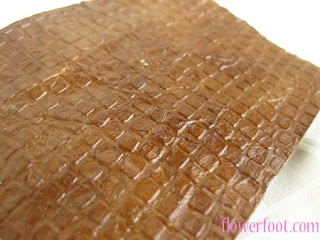
In yesterday's post, I showed you a "leather" wallet that I created for a friend's birthday. You can see that post HERE. The look of leather is really simple to achieve. All you need is brown cardstock and a dark brown ink. For this project I used Chocolate cardstock from Close to My Heart and Vintage Photo Distress Ink from Ranger. This technique uses water on cardstock which causes the paper to curl and shrink slightly. It is helpful to have a Cuttlebug, Wizard or Sizzix to flatten the paper.

1. Spritz cardstock lightly with water. Do not saturate.
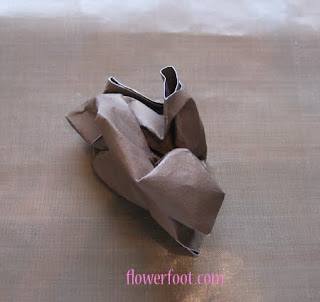
2. Crumple and carefully unfold cardstock. Repeat until desired distressed effect is achieved.


3. If you wish to emboss, now is the time. Using your Cuttlebug or other machine, emboss cardstock. Once embossed, crumple and unfold cardstock.


4. Allow cardstock to dry.

5. Sponge a dark brown ink over your cardstock. Ranger’s Vintage Photo Distress Ink was used here. Black Soot Distress Ink was sponged on some of the edges for further detail.


6. In order to flatten your cardstock, run cardstock through Cuttlebug again between two plates or place under a flat, heavy object (yellow pages anyone?).

7. To achieve the shiny leather look, paint with a light coat of Modge Podge Gloss-Lustre and allow to dry.

8. Use for your project.

Wednesday, August 5, 2009

Flower Soft Info and Tutorial

I am getting a lot of inquiries about Flower Soft so I thought I would point you in the right direction to get you started. I recently took a class on how to use the product at the Creating Keepsakes Convention in my area and I recommend that if such a class is offered near you, it is definitely worth the time and small fee for the hands on experience.

The best place to start is on the Flower Soft Website where you can purchase the product and also see samples of how it is used. The Flower Soft glue is Aleen's Tacky Glue which can be purchased at your local craft store so don't waste your money on purchasing from them. By all means, use a coupon and save on shipping. The glue needs to dry clear and fairly quickly. Someone had mentioned using Liquid Glass and while I have not tried it, I am not sure that it will work in this instance because when it dries, it is shiny.

Below is a video tutorial by Suzanne Deane which you may find helpful. Bo kindly pointed this video out to me on the CWC site.


I hope you will all give it a try. It adds so much dimension to cards and layouts and the uses are endless. My daughter and I are really enjoying working with this product. Now if only I could get them to pay me for using it.

Card Examples:


Happy Birthday


Happily Ever After


Mojo Monday - Sketch 98

Thursday, July 9, 2009

Paper Roses - Tutorial


This is one of the first cards I ever made. My daughter and I would spend hours making these little roses so I solicited her assistance in making this tutorial. They are very simple to make and precision is really not required.

First cut a square. The bigger the square, the bigger the rose. The one pictured here is 2 inches. Then draw a spiral on the square as shown in Figure 1. The tighter the spiral the fuller the rose. Be sure your lines are faint. I made the lines dark for purposes of the picture.


Cut along lines of your spiral. My daughter cut outside the lines for illustration purposes on this one (she wanted me to be sure and tell you that she does know how to cut on the lines).


Then start rolling the paper from the outside toward the center. Roll very tightly. I use an embossing tool to start the rolling process.


When you get to the end, let the roll unravel a bit to form the rose and add a glue to the bottom to hold it together and viola! You have your rose which you can then attach to your card front or wherever.


Variations:
Ink the edges before you roll to add dimension. Add glue to edges of rolled rose and dip in glitter. Emboss edges of rolled rose.

CTMH Products
Cardstock –White, Daisy, Juniper, Tulip
Ink – Juniper, Tulip
Stamp Sets – Playful Flourishes, Blooming Flourishes

Other
Birthday Sentiment from Inkandinkado stamp set

Flower Petals

acrylic paint All Dressed Up Altered Items Anniversary Aurora Wings Baby Baby Shower bezels Bind-it-All Birthday Blog Hop Bookmark Bridal Shower card CardMaker Cards CAS2011fallDT CFC Challenges Ching Chou Kuik Christmas Communion Congratulations Cooking Copic Cricut Cricut Art Philosophy CTMH CTMH News CTMH Stamps Digi Stamps Digital Paper Distress Inks Distress Paint Dylusions Easter Elizabeth Bell Embossing Engagement Fall Fancy fantasy Father's Day Favors fl Flower Soft Flower Soft Blog Hop Flower Soft Display Globes Flower Soft Downloads Flower Soft molds Flower Soft Stamps Flower Soft Toppers Flower Soft Wires Friendship gelli prints General Get Well Gift Card GinaK Designs Giveaway Glimmer Mist Graduation Gratitude Halloween Heartfelt Creations Heartfelt Creations Alumni DT Heartfelt Creations DT Hero Arts Home Decor Hostess Gift Ice Resin Impressabilities Impression Obsession In the Pink Invitations jewelry JustRite Kara's Corner keychain Kool Tak La La Land Love Mabel Lucie Attwell Make it Monday Mardi Gras Masculine Media Mixage Memory Box dies MFT Mini Album Miss You Mitzi Sato-Wiuff Mixed Media MLK modeling paste Mojo Monday Mother's Day Moxie Fab Music My Favorite Things My Mind's Eye Nestabilities Our Daily Bread Designs Paper Crafts Paper Piecing Passover Patriotic Peachy Keen Penny Black Photoshop Polka Doodles PPinkyDolls Project Pea DT PTI Blog Hop PTI Dies PTI Stamps Publications Recipes resin Sale Saturated Canary Scrapbooking Shabby Chic Shapeabilities Silk Acrylic Glaze Silks Simply Betty Sizzix Dies Sketch Slinky Tart Slinky Tart DT SNSS Spellbinders Spring St. Patrick's Day Stamp Camp Stampendous Stamping Stamping Chef Stationery stencil Sugar Pea Designs Summer Sweet 'n Sassy Sweet Pea Stamps Sympathy Tags Teacher Templates Thank You Thanksgiving The Stamps of Life Thinking of You Tiddly Inks Tim Holtz tips TSC DT TSOL TSOL DT Tutorial Valentine Vellum Video Vintage Want2Scrap Water Color WCMD Wedding Winners Winter Workshops and Classes WPlus9
Related Posts Plugin for WordPress, Blogger...