Showing posts with label Embossing. Show all posts

Thursday, June 25, 2015

Cherry Pop Chill - The Stamps of Life


If it's hot where you are you will definitely enjoy this clean and simple card using the new Popsicle Dies from The Stamps of Life.


I embossed the card base using the Flower Power embossing folder and then I cut out the popsicle twice using the die - first from Kraft cardstock and then from Strawberry. I stamped one of the patterns from the patterns4pops stamp set using Versamark and embossed with clear embossing powder and then cut off only the top of the popsicle and adhered it over the sticks. I added twine and stamped the word "Chill" and popped up the panel using foam tape.


Products Used:
Stamp Sets - patterns4pops, pops2eat
Paper - SS White and Kraft
Ink - Strawberry and Licorice, Versamark
Flower Power embossing folder, twine, clear embossing powder

Thursday, May 21, 2015

The Stamps of Life - Hello My Friend


This was a fun card to make. I used the new die from The Stamps of Life to cut the word window directly into my cardstock. I then placed some patterned paper behind it.


The card base was embossed using the Flower Power embossing folder and I used foam tape to raise the panel and then added some green adhesive gems for my embellishments.

This die is very versatile and comes with a coordinating outer circle die. There is a lot you can do with it so I hope you check out the samples on the The Stamps of Life Blog.


Products Used:
Paper - Celebrate Paper Collection, SS White
Hello My Friend Circle dies, Flower Power embossing folder, adhesive gems

Monday, April 27, 2015

The Stamps of Life - Birthday Wishes


Today's card is all about texture.

I used the new Flower Burst embossing folder from The Stamps of Life to emboss a piece of Kraft cardstock and then I ran some white ink over the raised area and along the edges. I added some gems to the centers of the flower bursts (the almost remind me of fireworks).


I cut the ribbon slides from the Lady Bug framelits set and stamped the sentiment from spinner2stamp set and added my coordinating ribbon.


Products Used:
Stamp Set - spinner2stamp
Paper - Kraft and Rustic Cream
Ink - Chocolate, Powdered Sugar
Flower Burst embossing folder, Lady Bug Framelits, germs, ribbon

Sunday, December 7, 2014

Peace on Earth


Here's a super quick and easy card for this holiday season. I used the Lost Without You stamp set from Sugar Pea Designs and stamped it with Versamark onto some dark blue cardstock. I then embossed with silver embossing powder. I did the same with the large star from the same set and then framed the image with white.


I used a silver paint pen to go around the edges of my card base to tie in with my silver. I stamped my sentiment and then added some adhesive-backed gems to the star and either side of my sentiment and viola! done.

How are your holiday preparations going? I still have a lot to do and I feel like time is moving too quickly.


Products Used:
Stamp Set - Lost Without You
Ink - Versamark
Paper - SS White and Enchanted Evening
Spellbinders Wonky Rectangles, silver embossing powder, silver paint pen, gems

Tuesday, June 24, 2014

June Heartfelt Creations Alumni DT Blog Hop

Welcome to the June Heartfelt Creations Alumni DT Blog Hop! Be sure to comment along the way in order to be eligible to win the $25 gift certificate to the Heartfelt Creations Store. There is a list of all the participants at the bottom of the post so make sure you visit all the blogs for a better chance at winning. Comments close at midnight on Friday, June 27, 2014 and a random winner will be announced on Saturday, June 28th at noon.

For my project I created a tag. First I stamped the flower image with Versamark and them embossed in gold. I painted the image with some Silk acrylics that was slightly watered down. I then sponged over the entire tag with various Distress Inks in blues, greens and some pink. I spritzed with a little water for some interest and then stamped my sentiment. I then added some modeling paste in areas through a stencil.

When the paste was dry, I went over the raised areas with some gold acrylic paint. I also went around the edges of the tag with the same gold paint and also along the brown cardstock that  I mounted the tag to. The water droplets you see come from the Viva Transparent Pearl Pen. I used a decorative corner punch, a couple of adhesive gems and a grommet to finish off the tag.

Don't forget to leave a comment here and on the other designers' blogs in order to be eligible for the $25 Heartfelt Creations gift certificate. Once again, you have until midnight Friday, June 27, 2014. You're next stop is Selma's Blog. You're going to love what she created!

Alumni DT Participants
Giovana Smith
Candy Slabaugh
Amarilys Doria
Lisa Nazario-Gregory
Vicki Dutcher
Cibele Glazer (You Are Here)
Selma Stevenson
Emilia van den Heuvel
Linda Loew
Glenda Brooks
Mary Faus
Sarah Miller
Alissa Wells
Lisa Allen


Products Used:
Stamps - Delicate Aster Vase and Tattered Blossom Swirls
Paper - White, Chocolate
Ink  - Versamark, Versafine Vintage Sepia, various Distress Inks
Silks acrylics, Viva Transparent Pearl pen, gold embossing powder, modeling paste, diamond stencil, gold acrylic paint, corner punch, adhesive gems, grommet, ribbon.

Monday, April 7, 2014

Be a Star Box Card

Skin - E000, E00, E11, E21, E04, V95, R20; Hair - E51, E53, E55, E57; 
Outfit - R91, R83, R85, R59, YG0000, YG03, G82; Guitar - YR21, YR23, YR24, YR27, E33, E35, E37, W3, W4

I was asked to make a card for a special girl who was turning 10 this past weekend. She is a cutie with beautiful blonde hair and loves to play the guitar. I had recently see these box cards "pop" up all over blogland and I thought it would be the perfect interactive card for a 10 year old. I found the tutorial for the Pop-Up Box Card at Splitcoast HERE.


click to enlarge
I found the perfect digital image from La La Land Crafts of the little girl with the guitar. I printed her and colored her with copics. I then cut her out and attached her to the card. I also cut out stars with several different dies, glittered and embossed them and attached then to some clear acetate. I also die cut the little girls name and age.

I used my clear Wink of Stella glitter pen on the band in her hat and also on her boots, as well as on the raised dots on the large embossed star behind her. Unfortunately, this was hard to capture with the camera but it adds a beautiful glimmer to the image.

I added a sentiment to the back and left a large area for her mom and dad to write a message.

I wish I could have been there to see her face when she opened it. This was one of those projects that I just loved making. I think I may have to make some more. ;)


Products Used:
Stamp Sets - Mod Marci (digi), PTI Superstars and Birthday Basics
Ink - Versafine Black Onyx
Paper - Hibiscus Burst, Sweet Leaf, patterned paper from my scraps
PTI Block Alphabet Upper and Lower, Bubble Talk and By the Numbers dies, Spellbinders Wonky Rectangles, Sizzix, Copic, Wink of Stella Clear, glitter

Tuesday, March 25, 2014

March Heartfelt Creations Alumni DT Hop


Welcome to the April Heartfelt Creations Alumni DT Blog Hop! Be sure to comment along the way in order to be eligible to win the $25 gift certificate to the Heartfelt Creations Store. There is a list of all the participants at the bottom of the post so make sure you visit all the blogs for a better chance at winning. Comments close at midnight on Friday, March 28, 2014 and a random winner will be announced on Saturday, March 29th at noon.

For my card this month I stamped my image using Versamark and then sprinkled clear embossing powder. I then used a couple of distress inks and a water brush to color over the image for a watercolor effect. I mounted the panel onto a base that was dry embossed with a Sizzix folder. I really like the clean and simple look and the card is perfect for when you need something quick.

Don't forget to leave a comment here and on the other designers' blogs in order to be eligible for the $25 Heartfelt Creations gift certificate. Once again, you have until midnight Friday, March 28, 2014. You're next stop is Giovanna's Blog. You're going to love what she created!

Alumni DT Participants

Amarilys Doria
Cibele Glazer (You are Here)
Giovana Smith
Deneen Treble
Caroline Duncan
Loretta Lock
Glenda Brooks
Lee Ann Barrett
Mary Faus
Candy Slabaugh
Alissa Wells
Emilia van den Heuvel
Lisa Allen


Products Used:
Stamp Sets - Script Aster Background and Classic Message
Paper - SS White
Ink - Memento Gray Flannel; Versamark; Antique Linen, Tumbled Glass, Dried Marigold, Wild Honey, Forest Moss Distress Inks
Sizzix embossing folder, clear embossing powder

Wednesday, November 27, 2013

Flower Soft - Santa Bottle Tag


This week I wanted to show you a project I created with the Santa and Pals stamp set from Flower Soft.

click to enlarge
click to enlarge
This set is so fun and I decided to use it to make a bottle tag. I cut the tag with a die and also cut an extra piece that I ran through the cuttlebug using a Sizzix bricks embossing folder. I rubbed Fired Brick and Vintage Photo distress inks over the embossing. I stamped and colored the Santa image with my copics and then cut him out. I then added some Ultra Fine White Flower Soft to his hat, beard and cuffs for some added texture. I cut a strip of dark grey cardstock and attached it to the top, glued Santa behind it and popped the panel up on the bottle tag.

Can't you just imagine Santa, after a long night of delivering gifts, emerging from the last chimney with a drink? I can.

As always, please be sure to check out the Flower Soft Facebook page for more inspiration.


Products Used:
Stamp Sets - Flower Soft Santa & Pals and Christmas Spirit
Paper - SS White and Smokey Shadow
Ink - Flower Soft Ultra Fine White, Spellbinders Die, PTI Wine Bottle Tag die
Copic Markers - R22, R24, R27, R29, R59, R89, E00, W1, W3

Tuesday, November 12, 2013

Flower Soft - Santa Toppers


With the holidays fast approaching, you may be looking for cards that are quick and easy and can be done at the last minute. If this is the case, you are in luck because today I am highlighting the Flower Soft Santa Toppers. They come in packs of 6 (3 each of 2 designs) and they are already cut to the perfect A2 size to leave a little border around the image on your card base.

click to enlarge
click to enlarge

I used the Santas from 2 different packs and the Christmas Blessings stamp set to create these cards. I simply stamped my sentiments onto the preprinted image in Versamark ink and heat embossed with gold embossing powder. After I adhered the topper to my card base, I went around the edges with a gold paint pen. How easy is that? You could do this with all 6 cards in the pack and you would have a cute set to give as a gift or to send yourself.

I hope you'll give it a try.


Products Used:
Stamp Set - Christmas Blessings
Paper - Pure Poppy
Ink - Versamark
Forest Santa and Magical Santa toppers; gold embossing powder; gold paint pen

Friday, October 25, 2013

Flower Soft Shaker Tag


Today I have a shaker tag to show you using the new Winter Animals Design Set from Flower Soft.

click to enlarge
I cut the tag using two different Spellbinders dies and then embossed the cardstock with the Darice Snowflakes folder. I edged it with white ink and also added a little glitter to the raised snowflakes with my Wink of Stella pen. I added tiny rhinestones to their centers as well. I used Polar White Flower Soft for my filler.

This is a fairly big tag but could also be used as a card front if you prefer or even an ornament for the tree.


Products Used:
Flower Soft Winter Animals Design Set
Stamp Set - The Lamppost
Paper - Enchanted Evening, SS White
Ink - CTMH White Daisy and Dutch Blue; Versafine Onyx Black
Flower Soft Polar White, Darice Snowflake embossing folder, Spellbinders Labels 18 and 25 dies

Tuesday, May 28, 2013

Heartfelt Creations DT Alumni Hop

Sand - E41, E81; Chair - W00, W1, W3, W5, E43; Grass YG95, YG97, YG99
Pin It
Welcome to the Heartfelt Creations Design Team Alumni Hop for the Month of May. There is a list of all this month's participants at the end of this post and you will want to visit each of the designers because there is a $25 gift certificate to the Heartfelt Creations store up for grabs. All you have to do is leave a comment on each blog between now and Friday, May 31, 2013 to be eligible. One random person will be chosen and her/his name announced on June 1.

click to enlarge
Since we are gearing up for summer, I made a clean and simple card using the Seascape stamp set which I stamped and then colored with copics. I added a little Ultra Fine Flower Soft in Sand for some texture.

Don't forget to visit the ladies below and leave some love.


Dina Kowal
Selma Stevenson
Nataliya Simpson
Candy Slabaugh
Emilia van den Heuvel
Vicki Dutcher
Sarah Miller
Caroline Duncan
Mary Faus
Cibele Glazer (you are here)
Lisa Allen


Products Used:
Stamp Sets - Heartfelt Creations Seascape and Classic Message
Paper - SS White and Fine Linen
Ink - Memento Tuxedo Black
Spellbinders Bricks and Bark M-Bossabilities, Flower Soft Ultrafine Sand
Copic Markers

Monday, March 5, 2012

Missing Mojo

Pin It
Happy Monday everyone!  This weekend I spent no time in my studio because the mojo just wasn't there but I did do something fun.  I read a book cover to cover!  My daughter is playing softball this year for the first time, so my DH took her out to get some equipment and I was left home alone!  My daughter wanted me to read the Hunger Games because she just finished it and said it "was the best book ever!"  She also wants me to take her to the movie when it comes out at the end of this month. So that's the book I read and I have to admit that although I wouldn't go as far as saying it was the best book ever, it was very good.

Now back to my mojo.  This morning I thought what better way to get back into the swing of things than to try a challenge so this card is for this week's CAS Challenge at Splitcoast to create a monogram card.  I embossed the Mat Stack 2 die on the top and stamped the coordinating image and then my monogram.  I then embossed the bottom with the Swiss Dots folder and added a little ribbon.  That's it!

Now that the juices are flowing, I'm going back to my table and play around.  Have an awesome day!

Products Used:
Stamp Sets - PTI Mat Stack 2
Paper - PTI SS White
Ink - Versafine Black Onyx
Mat Stack 2 die, Swiss Dots embossing folder, black ribbon, dimensional foam

Wednesday, February 29, 2012

Heartfelt Creations - Sunburst

Pin It
Happy Wednesday!  Thanks for joining me today as I show you a new project made with the latest Heartfelt Creations release, Floral Cross Collection.

click to enlarge
To make this card I had to do a little masking with some tape to get the sentiment I wanted from the Cross and Lilies stamp set.  I put the tape on first, before inking up the stamp and then removed it right before stamping on my partial circle.

To get that sunburst look, I sponged on some Inka Gold - Old Gold onto the rays and then used a little Yellow and Orange Gelato.  In person, the rays have some glimmer because of the Inka Gold.  I also sponged a little of the Old Gold along the top edge of my partial circle.  This is a great card for Easter don't you think?

As usual, if you would like to see some awesome projects, please visit the Heartfelt Creations Blog. Also, a reminder that the search for new Design Team members is under way and you can get all the details on the blog as well.
Thanks for stopping by!

Products Used:
Paper - PTI SS White
Ink - Versafine Black Onyx
Foam dimensionals

Wednesday, February 22, 2012

Heartfelt Creations - Strength and Courage

Pin It
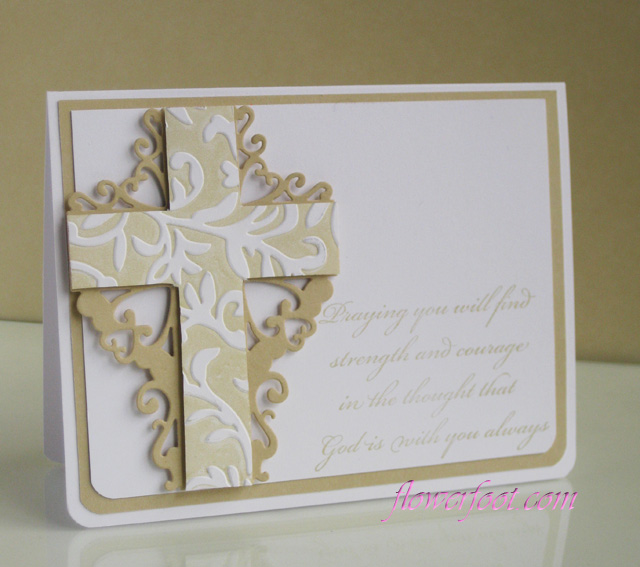
Happy Wednesday!  I have a new Heartfelt Creations project to show you today using the newest Floral Cross Collection.  This time I made a sympathy card using a technique I found on Splitcoast but you could easily change this to a Baptism, Communion or Easter card by changing the sentiment.
click to enlarge

I used Bamboo ink on the inside of my embossing folder and embossed onto white cardstock.  I love the look you get with this technique.  I layered the embossed cross onto the die cut cross which I cut using Bamboo cardstock.  I added the sentiment with Bamboo ink for a soft look.  You can find the complete instructions on the Heartfelt Creations blog, along with some amazing creations from the other Design Team members.

Need another reason to check out the Heartfelt Creations Blog?  Well the search for a new Design Team is underway and if you love their products as much as I do, I strongly encourage you to apply.  This is a great team to be a part of and the stamps and dies are so fun and easy to work with!  You can read all the details HERE.

Products Used:
Paper -PTI SS White; CTMH Bamboo
Ink -CTMH Bamboo
Sizzix embossing folder, foam dimensionals, corner rounder

Flower Petals

acrylic paint All Dressed Up Altered Items Anniversary Aurora Wings Baby Baby Shower bezels Bind-it-All Birthday Blog Hop Bookmark Bridal Shower card CardMaker Cards CAS2011fallDT CFC Challenges Ching Chou Kuik Christmas Communion Congratulations Cooking Copic Cricut Cricut Art Philosophy CTMH CTMH News CTMH Stamps Digi Stamps Digital Paper Distress Inks Distress Paint Dylusions Easter Elizabeth Bell Embossing Engagement Fall Fancy fantasy Father's Day Favors fl Flower Soft Flower Soft Blog Hop Flower Soft Display Globes Flower Soft Downloads Flower Soft molds Flower Soft Stamps Flower Soft Toppers Flower Soft Wires Friendship gelli prints General Get Well Gift Card GinaK Designs Giveaway Glimmer Mist Graduation Gratitude Halloween Heartfelt Creations Heartfelt Creations Alumni DT Heartfelt Creations DT Hero Arts Home Decor Hostess Gift Ice Resin Impressabilities Impression Obsession In the Pink Invitations jewelry JustRite Kara's Corner keychain Kool Tak La La Land Love Mabel Lucie Attwell Make it Monday Mardi Gras Masculine Media Mixage Memory Box dies MFT Mini Album Miss You Mitzi Sato-Wiuff Mixed Media MLK modeling paste Mojo Monday Mother's Day Moxie Fab Music My Favorite Things My Mind's Eye Nestabilities Our Daily Bread Designs Paper Crafts Paper Piecing Passover Patriotic Peachy Keen Penny Black Photoshop Polka Doodles PPinkyDolls Project Pea DT PTI Blog Hop PTI Dies PTI Stamps Publications Recipes resin Sale Saturated Canary Scrapbooking Shabby Chic Shapeabilities Silk Acrylic Glaze Silks Simply Betty Sizzix Dies Sketch Slinky Tart Slinky Tart DT SNSS Spellbinders Spring St. Patrick's Day Stamp Camp Stampendous Stamping Stamping Chef Stationery stencil Sugar Pea Designs Summer Sweet 'n Sassy Sweet Pea Stamps Sympathy Tags Teacher Templates Thank You Thanksgiving The Stamps of Life Thinking of You Tiddly Inks Tim Holtz tips TSC DT TSOL TSOL DT Tutorial Valentine Vellum Video Vintage Want2Scrap Water Color WCMD Wedding Winners Winter Workshops and Classes WPlus9
Related Posts Plugin for WordPress, Blogger...